Saturday, 17 December 2011

Christmas Hamper Ideas - Make your own

Christmas hampers are very popular for corporate gifts and competition prizes. Why not make your own hamper filled with all your favourite treats and donate to your local church or school christmas fayre? Alternatively since my recipes are soooo yummy, you may want to make the hamper and give it to your mother in law who would certainly appreciate the thoughtful gesture. No? Ok, may be not, it was only a suggestion!

Click on the links below to take you to the relevant recipe page
Top Right: Alternate Mincepies
Top Centre: Cheese Straws
Top Right: Marinated Feta Cheese
Bottom Left: Roasted Peppers
Bottom Centre: Sausage Rolls
Bottom Right: Rhubarb Chutney
You should follow me on twitter here

If you have a sweet tooth and/or enjoy baking I have some fabulous seasonal baking recipes that I am sure you will enjoy. Edible gifts show a lot of care and the great thing is that they can be shared and enjoyed by all!
Top left of image:
Spiced Christmas Biscuits
Top centre image: Snowman Cupcakes
Top Right: Sophisticated Festive Cupcakes
Bottom Left: Snowflake Cakepops
Bottom Centre: Christmas Parcel Cupcake
Bottom Right: Florentines
You should follow me on twitter here

Friday, 16 December 2011

Christmas Baking Ideas & Recipes

Christmas is a time for family, friends and festive treats. Homely scents waft round the houseoriginating from the kitchen, the heart of the family home.
I have several baking ideas and recipes here on my blog along with edible Christmas treats which are great when hosting or going to a party or indeed making your own Christmas hamper for friends, your church or school raffle. It's not about how much a gift costs, it's the time thought and effort you have put into the gift. Edible gifts show a lot of care and the great thing is that they can be shared and enjoyed by all!
Click on the links below to take you to the relevant recipe page


Top left of image: Spiced Christmas Biscuits
Top centre image: Snowman Cupcakes
Top Right: Sophisticated Festive Cupcakes
Bottom Left: Snowflake Cakepops
Bottom Centre: Christmas Parcel Cupcake
Bottom Right: Florentines

You should follow me on twitter here.


Chocolate Christmas Tree Cupcakes

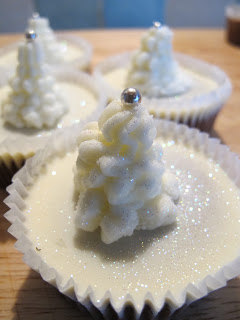
These chocolate christmas tree cupcakes went down really well in the office. I did a selection of white, milk and dark chocolate toppings with a white chocolate christmas tree. I chose to do chocolate orange sponge to add to the Chrismassy feel of these delicious cupcakes.
Chocolate Christmas Tree Cupcakes
Makes: 12 cupcakes
Prep Time: 40 mins
Cooking time: 20-25 mins

Preheat oven 180oC
Chocolate Orange Cupcake Ingredients:
6oz margarine
6oz sugar
6oz SR Flour
1 tbsp baking powder
3 medium eggs

2 tbsp cocoa 
2 orange grinds
2 tbsp orange juice 
100g white/milk/dark chocolate
white edible glitter
White Chocolate Christmas Trees - White chocolate cupcakes
White Chocolate Christmas Tree Ingredients:
100g white chocolate
200g unsalted butter
400g icing sugar
12 silver sugar balls
12-hole cupcake/muffin tray, lined with paper cases.
White Chocolate Christmas Trees - Dark chocolate cupcakes
Method:
1. To make the cupcakes cream the marg and sugar together to get a nice light colour. 
2. Add the SR flour, cocoa and baking powder. 
3. Once fully mixed add in eggs, the orange grinds and orange juice. 
4. Mix through to create a light and airy mixture.
5. Separate the mix into the cup cases and pop into the preheated oven. 
6. Melt the chocolate (whichever type you have chosen) in a glass bowl over a saucepan of simmering water. Do not allow any of the water to make contact with the chocolate.
7. Allow the cupcakes to cool a little before pouring the melted chocolate evenly over the cupcakes. Allow to cool.
8. Mix the butter and icing sugar together.
9. Melt the white chocolate in a glass bowl over a saucepan of simmering water. Allow to cool but not so much as to go back to solid form. Add this chocolate to the butter and icing mix.
10. Immediately fill your piping bag with the white chocolate butter icing.
11. Keep the nozzle at a 90oC angle and pipe 3 blobs on top of each other ensuring the first one makes contact with the cooled chocolate cupcake topping and that they decrease in size.
12. Add a sugar ball onto the top of each white chocolate tree.
13. Sprinkle the cupcakes with edible glitter add a little Christmas magic.
White Chocolate Christmas Trees - Milk chocolate cupcakes
Top left of image: Spiced Christmas Biscuits
Top centre image: Snowman Cupcakes
Top Right: Sophisticated Festive Cupcakes
Bottom Left: Snowflake Cakepops
Bottom Centre: Christmas Parcel Cupcake
Bottom Right: Florentines
You should follow me on twitter here.

Thursday, 15 December 2011

Sophisticated Festive Cupcakes

Cupcakes are not fun just for children. Even though I'm sure children would plough their way through these quite happily, the subtle combination of flavours lend itself to a more experience and appreciative palette.
Orange and physalis berry cupcake
Makes:12 cupcakes
Prep Time: 40 mins
Cooking time: 20-25 mins

Preheat oven 180oC

Orange cupcake mixture:
6oz margarine
6oz sugar
6oz SR Flour
1 tbsp baking powder
3 medium eggs
Couple of tsp of milk
2 orrange rinds, grated

2 tbsp fresh orange juice, squeezed from grated orangeda 12-hole cupcake/muffin tray, lined with paper cases.
200g White chocolate
100g dark chocolate
Punnet of physalis berries
Sophisticated cupcakes
Orange and physalis berry cupcake method:
1. Cream the marg and sugar together to get a nice light colour. Then add the SR flour and baking powder. Once fully mixed add in eggs and tsp of milk. Don't forget you can always add more milk. Mix through to create a light and airy mixture.
2. Separate the mix into the cup cases and pop into the preheated oven for 20-25mins.

3. While the cupcakes are baking melt the white and dark chocolate in separate glass bowls over simmering water in saucepans. Do not allow the water to come in contact with the chocolate.
4. You don't need to wait for the cooked cupcakes to cool too much before you pour the white chocolate evenly over the cupcakes making sure the chocolate doesn't flow over the cake cases.
5. Pull the leaves back from the berries and dip the berry into the dark chocolate. Place on a smooth surface to cool. 
6. Once the white chocolate has cooled you can place a dark chocolate coated berry on top.
You should follow me on twitter here.
Christmas Parcel decorated cupcakes
Christmas Snowman Cupcake
Christmas Decorated Spice biscuits
Halloween decorated cupcakes
Chocolate dipped physalis berries
  

Wednesday, 14 December 2011

Decorate your own Christmas Tree Baubles

Most families have their own Christmas tree tradition. In my family I buy my mom a new bauble every year and as long as it fits in with the colour scheme of green, red and gold as dictated by my sister then it's proudly placed on the Christmas tree.
Handmade Snowflake Christmas Tree Bauble
What you need to make your own Christmas tree baubles:
Plain Baubles (matt are preferable for glue to stick)
PVC glue
White glitter
Christmassy material
How to make your own Christmas tree baubles:
Cut out shapes using the material. Make sure they are large/small enough to fit onto your bauble. Lightly spread the glue onto the back of the material and place onto the bauble. Use the glue sparingly as not to dampen the material as this will cause the material to bubble up and cause an uneven finish. Draw around the edge of the shape with your glue. Allow the glue to dry a little so it's tacky. Then sprinkle the white glitter generously over the glue. It's best to have a sheet of folded paper underneath in order to easily collect the glitter and then to bend (using the fold) to funnel the glitter back into your pot. My practical tip: Hang on the tree and allow to dry.
Handmade Heart Christmas Tree Bauble
Edible Christmas Gifts
You should follow me on twitter here

Tuesday, 13 December 2011

Snowman Christmas Cupcake

Snowman Christmas Cupcake
How to decorate a Snowman Cupcake:
You will need some cooled cupcakes. For a chocolate cupcake recipe click here and for a vanilla cupcake recipe click here.
You will need:
Royal Icing handmade snowman
Blue and white butter icing
Cooled cupcakes
White edible glitter
Wilton icing nozzle no. 21
Piping bag

Top Tips for using an icing bag: For the nozzle in the bag. Bend the edge of the bag outwards and place the nozzle in a tall glass. This allows you to use both hands now. Scoop the butter cream up and lightly drop it into the open bag. Once you have put all you can/need into the bag slowly shake the bag down forcing the icing nearer the nozzle and eliminating air bubbles. Gather the ends of the bag with a light grab and then twist. The 'grab' will prevent the bag from sticking which makes it difficult to refill. The twisted bag should fit nicely into the palm of your hand enabling you to keep the pressure whilst squeezing the butter icing.

Create your own icing Christmas Snowman
Top Tip for creating a two-tone butter icing: Since you are trying to create a snow effect with the butter icing a two-tone icing with create visual texture. When adding in food colouring to the white butter icing use a cocktail sticks worth of food colouring paste. Try not to use the liquid food colouring as the colour creation is hard to control. Mix the blue food colouring paste in with the white butter cream but not completely and so leaving patches of white in the mixture.  
When piping the butter cream place the nozzle at 90 degrees. Keep the pressure constant and slowly and controllingly pipe on the cupcake. Make sure the butter cream makes contact with the cupcake before you pull the piping bag away. Lightly sprinkle the edible glitter onto the piped butter cream and place your cheeky Christmas snowman on top.
Tada! You have a Snowman Christmas Cupcake. 

Learn how to make an icing snowman
Spiced Christmas BiscuitsSophisticated Festive Cupcakes
Snowflake Cakepops
Christmas Parcel Cupcake
Florentines


You should follow me on twitter here.

Monday, 12 December 2011

Sugar paste Icing Christmas Snowman

Give your homemade christmas icing snowmen a personality
If you are stuck on how to decorate Christmas cupcakes or indeed your family Christmas cake then look no further than these cheeky chaps.
What do I need to make a sugar paste snowman?
White royal icing
Black royal icing
Red royal icing
Orange icing
Black sugar pen
Few drops of water
Top Tip when using coloured sugar paste: Try not to use icing sugar as this will dull the colours of the icing.
1. Make the snowman head and body. Roll two balls of the white icing. Make the body a little larger than the head. Push your finger at the top of the body to create an indent. Place the head within that indent.
2. Next, make the nose. Create a little ball of the orange icing in the palm of your hand. Then at one end roll the ball back and forth to create a carrot shape. Stick the nose onto the head ball using a tiny bit of water.
3. Now you have the nose, make a face using the black liquorice sugar pen. This is the perfect opportunity for you to create a personality for him. They can be all a little different - a family of quirky icing snowmen!
4. Make your snowman's scarf. Roll the red icing creating a sausage. Make it as thin as suits the neck of the snowman, you don't want him swamped in an over sized scarf but you don't want him wearing something that looks he has bought it from Gap Kid. While the icing is still warm wrap the scarf round the neck of your snowman and trim to suit.
5. Now it's time to make the hat. Use the black royal icing and split it into 2 sections. With the first piece create a ball in the palm of your hand and flatten it out whilst in the palm of your hand with your thumb. Dab a little water on one side of the flatted black icing and attach it to your snowman's head. Now with the 2nd section of the black icing, once again create a ball in the palm of your hand. This time squeeze the ball between your thumb and forefinger. Choose one of your flattened sides and dab a bit of water on it before placing it down onto the flat part of the hat which is already on your snowman. You can decorate the hat by adding a little feather or a band of ribbon (icing). And there you have it - a cute Christmas snowman - congratulate yourself on a job well done.
You should follow me on twitter here.

Decorate a cupcake to create a cute Snowman Cupcakes

Sunday, 11 December 2011

Christmas Parcel Cupcake

Christmas Parcel Cupcake
How to decorate a cupcake as a Christmas parcel:
You will need some cooled cupcakes. For a chocolate cupcake recipe click here and for a vanilla cupcake recipe click here.

You will need:
Red royal icing
Green royal icing
Red edible glitter
Thimble full of water
Plain rolling pin (preferably plastic)
Patterned rolling pin
Circular cookie cutter
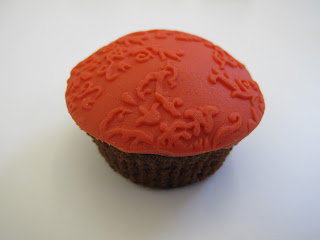
Decorated cupcake with damask pattern with no ribbon or bow

Top Tip for Primary Coloured Royal Icing: With regards to the royal icing for primary colours it's best to buy the pre-coloured icing rather than colouring it yourself.

Get decorating that cupcake!
1. Roll the red royal icing out. Try not to use additional icing sugar as this will dull the colour of the icing. Make sure the icing is even and you have used a smooth surface. 
2. Once rolled out this is where you need an even hand. Use the patterned rolling pin. Start from one end and with even pressure slowly roll the pin across the icing. Don't worry if you don't get it right the first time, just keep the icing sugar warm and keep trying. The pattern on the rolling pin I have used is Damask.
3. Once you are happy with your imprint use the circular cookie cutter which is the same size as the top of your cupcake. 
4. Attach the red icing to the top of the cupcake by lightly coating the bottom of the icing. Slowly and carefully place the icing on top of the cupcake and lightly press into shape.
5. And now to create the ribbon. Roll some green royal icing into a sausage and then flatten by either dabbing it down with your finger or if you want a crisper finish use the flat side of a knife. Once flat decide on how thick you wish the ribbon to be and use a knife to cut the green royal icing. Cut 3 even strips. Attach 2 of those strips of green royal icing ribbon to the top of the red royal icing by a little water.
6. Now make the royal icing bow. Use the third strip of green royal icing to create the bow. Cut a third off the strip. Now with the larger part of the strip take one end and place it in the centre, securing it with a dab of water. Do the same with the other end. With the 3rd you had cut off use that to wrap round the centre part and trim to fit.
7. Dab a little water on the bottom of the ribbon and place at the cross roads of the pre-fixed ribbon.
8. Sprinkle a little red edible glitter over the green royal icing ribbon and then you're done!
Learn how to make an icing snowman
Christmas Parcel decorated cupcakes
Christmas Decorated Spice biscuits

You should follow me on twitter here.

Saturday, 10 December 2011

Homemade Beef Burger with Sun Dried Tomatoes

Homemade beef burgers are really easy and super tasty. Homemade rhubarb chutney is a perfect accompaniment along with some spinach and rocket salad with olive oil and balsamic vinegar dressing.
Homemade beef burger with rhubarb chutney
Beefburger Ingredients:
500g Minced beef
1 Medium red onion
1 medium egg
6 sundried tomatoes
1 tsp cumin seeds
1/4tsp cayenne pepper
Beefburger Method:
1. Finely chop the onion to equal sizes. I try and use the best quality mined beef that I can afford. Mix all the ingredients together. The egg is used as a binding ingredient. The best way to mix the ingredients I find is to use my hands even though they do get icky.
2. Shape the mixture into beefburger shapes. I like to make a batch like this and freeze them. I rip a strip of baking parchment 8x30 inches and place a beef burger on the right, rotate and place then next beefburger on the left and rotate, etc etc.
3. When cooking my homemade burgers I like to brown the burgers in a non-stick pan before putting them under the grill. I put a slice of goats cheese on the top and back under the grill for 5 mins. For the best result when using top quality beef mince is to allow the burger to be a little pink in the centre.
Homemade rhubarb chutney is a perfect accompaniment along with some spinach and rocket salad with olive oil and balsamic vinegar dressing.
You should follow me on twitter here.

Thursday, 8 December 2011

Homemade Avocado and Salmon Sushi

This is a really great lunchtime recipe. I like to do these on a Sunday ready for work the next day. 


Ingredients:
Sushi Nori (seaweed sheets)
Reed map for wrapping
Avocado
Salmon Fillet
Sushi rice

It's really super easy.
1. Prepare the sushi rice. Wash 250g rice in cold water and drain. 
2. Transfer the drained rice into a saucepan with 340ml of cold water. 
3. Leave to soak for 30 mins.
4. Bring to the boil.
5. Cover and lower the heat to simmer for 10-12 mins or until the water has been absorbed.
6. Remove from heat and leave covered for 10 mins.
7. Allow the rice to cool.
8. Lay a nori sheet shiny side down on top of the mat
9. Place the cooled rice evenly for and inch and a half wide along the edge of the nori closest to you.
10. Slice the avocado into even slices and place horizontally onto the rice.
11. Slice the salmon and do the same as you did with the avocado
12. Slowly and firmly roll the edge of your filled nori roll over to using the map to keep the tension even. Keep rolling until there is 1 inch left. Dampen the edge of the nori with a fingertip of water to seal the nori. Hold in place for 30 secs.
13. With a sharpe knife dipped in water slice the the roll into even chunks and Bob's your uncle!
I like to use a little tamari sauce instead of soya as its wheat and gluten free.


Tuesday, 6 December 2011

Peppermint Homemade Chocolates Recipe - Christmas Hamper Special


Making homemade chocolates whether for dinner guests or as a present is a really great way of showing someone you care.
Method:
1. Melt the chocolate slowly in a glass bowl over hot water. Stir and continue to melt. When done drip chocolate into moulds, with a spoon.
2. Only fill half way. Place a piece of waxed paper onto the counter or cookie sheet. Turn moulds over and allow the excess chocolate to drip out onto your waxed paper.
 3. Wipe edges clean so you don't have any chocolate around the outside edges. Freeze 5-10 minutes.
 4. Pour chocolate nto each mould up to the top. Wipe edges again. Refreeze. Take out of freezer and pop homemade chocolates out.
Peppermint Filling:
4 tbsp butter, soft
450g icing sugar
1 tsp peppermint extract
4 Tbsp light corn syrup
Mix in mixer until mixture becomes smooth and can be rolled in a ball.


You should follow me on twitter here

See more of my top recipes

Monday, 5 December 2011

Red Velvet Cupcake Recipe - Christmas Hamper Special

Red Velvet Cupcakes
This is a really great recipe to use as a Christmas cake also as most of my friends and family are not too enamoured by a fruit cake. The clours (red sponge and white icing) look totally christmassy and last year when I made this cake I also used edible glitter flakes on the cake to make it super special.
This recipe makes a 6" cake, 2 tiers. I halved the recipe and made a 3rd tier. The original recipe yields 12 cupcakes.
Ingredients:
60g unsalted butter, at room temperature
150g caster sugar
1 egg
10g cocoa powder
20ml red food colouring (preferably Dr. Oetker brand)
½ tsp vanilla extract
120ml buttermilk
150g plain flour
½ tsp salt
½ tsp bicarbonate of soda
1½ tsp white wine vinegar 

Red Velvet 3 Tier Cake - Alternate Christmas Cake
Red Velvet Cake Method:
For the cake:

Preheat the oven to 170°C.
1. Beat butter and the sugar on medium speed until light and fluffy and well mixed.
2. Turn the mixer up to high speed, slowly add the egg and beat until everything is well incorporated.
3. In a separate bowl, mix together the cocoa powder, red food colouring and vanilla extra ct to make a very thick, dark paste. Add to the butter mixture and mix thoroughly until evenly combined and coloured (scrape any unmixed ingredients from the side of the bowl with a rubber spatula).
4. Turn the mixer up to slow speed, slowly pour in half the buttermilk.
5. Beat until well mixed, then add half the flour and beat until everything is well incorporated. Repeat this process until all the buttermilk and flour have been added. Scrape down the side of the bowl again.
6. Turn the mixer up to high speed and beat until you have a smooth, even mixture.
7. Turn the mixer down to low speed and add the bicarbonate of soda and vinegar. Beat until well mixed, then turn up the speed again & beat for a couple more minutes.
8. Pour into a lightly greased 6" cake tin or muffin cases.
9. Bake for about 40 mins or until done. Check for doneness by inserting a toothpick in the middle, should come out clean if done.
10. Leave to cool slightly in the tin before turning out onto a wire cooling rack to cool completely then frost.
For cream cheese frosting:
1. Beat the icing sugar and butter together on medium-slow speed until the mixture comes to gether and is well mixed. Mine formed crumbs instead.
2. Add the cream cheese in one go and beat until it is completely incorporated.
3. Turn the mixer up to medium-high speed. Continue beating until the frosting is light and fluffy (at least five minutes). Do not overbeat, as it can quickly become runny.

Read:
Top Heavy Chocolate Cupcakes
Top Heavy Vanilla Cupcakes
Learn how to make an icing snowman
Christmas Parcel decorated cupcakes
Christmas Decorated Spice biscuits
Halloween decorated cupcakes
Other yummy recipes
You should follow me on twitter here.

Sunday, 4 December 2011

Ganache Homemade Chocolates Recipe - Christmas Hamper Special


Making homemade chocolates whether for dinner guests or as a present is a really great way of showing someone you care.
Method:
1. Melt the chocolate slowly in a glass bowl over hot water. Stir and continue to melt. When done drip chocolate into moulds, with a spoon.
2. Only fill half way. Place a piece of waxed paper onto the counter or cookie sheet. Turn moulds over and allow the excess chocolate to drip out onto your waxed paper.
 3. Wipe edges clean so you don't have any chocolate around the outside edges. Freeze 5-10 minutes.
 4. Pour chocolate nto each mould up to the top. Wipe edges again. Refreeze. Take out of freezer and pop homemade chocolates out.
Ganache Recipe: 
227g dark chocolate
180ml heavy whipped cream
28g unsalted butter 

1tbsp brandy
You should follow me on twitter here.
Saturday, 3 December 2011

Florentines Recipe

A couple of years ago my friend Catherine gave me some gorgeous gifts from Fortum & Mason. Along with some Earl Grey Tea and Ground Coffee a tin of Florentines stole my heart and tastebuds. Since then I have been on the hunt for the perfect florentine recipe. It was no surprise that Delia Smith came to my rescue yet again. These very luxurious biscuits can't be rushed. They do need time but if you do have or make the time then they do make a marvellous present.
Ingredients:
150g dark chocolate (c.75% cocoa)
25g butter, plus a little for greasing
75g caster sugar
10g plain flour, plus extra for dusting
65ml double cream
50g whole almonds, blanched and cut into thin slivers
50g ready plaked almonds
50g whole candied peel, chopped
25g glace cherries, chopped
25g angelica or green glace cherries, finely chopped
Florentines Method:
1. Melt 25g of butter, together with the sugar and flour, in a small, heavy-based saucepan over a very low heat, and keep stirring until the mixture has melted.
2. Gradually add the cream, stir continuously to keep it smooth.
3. Add all the remaining ingredients, except the chocolate.

4. Stir thoroughly again, then remove the saucepan from the heat and put the mixture on one side to cool. 
5. Brush the baking sheets with a little melted butter, lightly dust with flour and then tap them to get rid of the excess flour. 
Note: Bake one sheet of the Florentines at a time.
6. Place heaped teaspoonfuls of the mixture on to one of the prepared baking sheets, spacing them about an 2.5 cm apart (to allow the mixture room to expand while baking).
7. Flatten each spoonful with the back of the spoon, then bake on a high shelf for about 12-15 minutes, or until golden.
8. Take them out of the oven
and leave the biscuits to harden on the baking sheets for 2-3 minutes, before quickly removing them to a wire rack to cool.

Learn how to make an icing snowman
Christmas Parcel decorated cupcakes
Christmas Decorated Spice biscuits
Halloween decorated cupcakes
You should follow me on twitter here.